
🚧 This repository is still under construction. 🚧
Please feel free to explore and contribute, but note that there may be frequent changes.


Real-time inference is performed using Torch/Tensorflow, Dacapo, and bioimage models on local data or any cloud-hosted data.
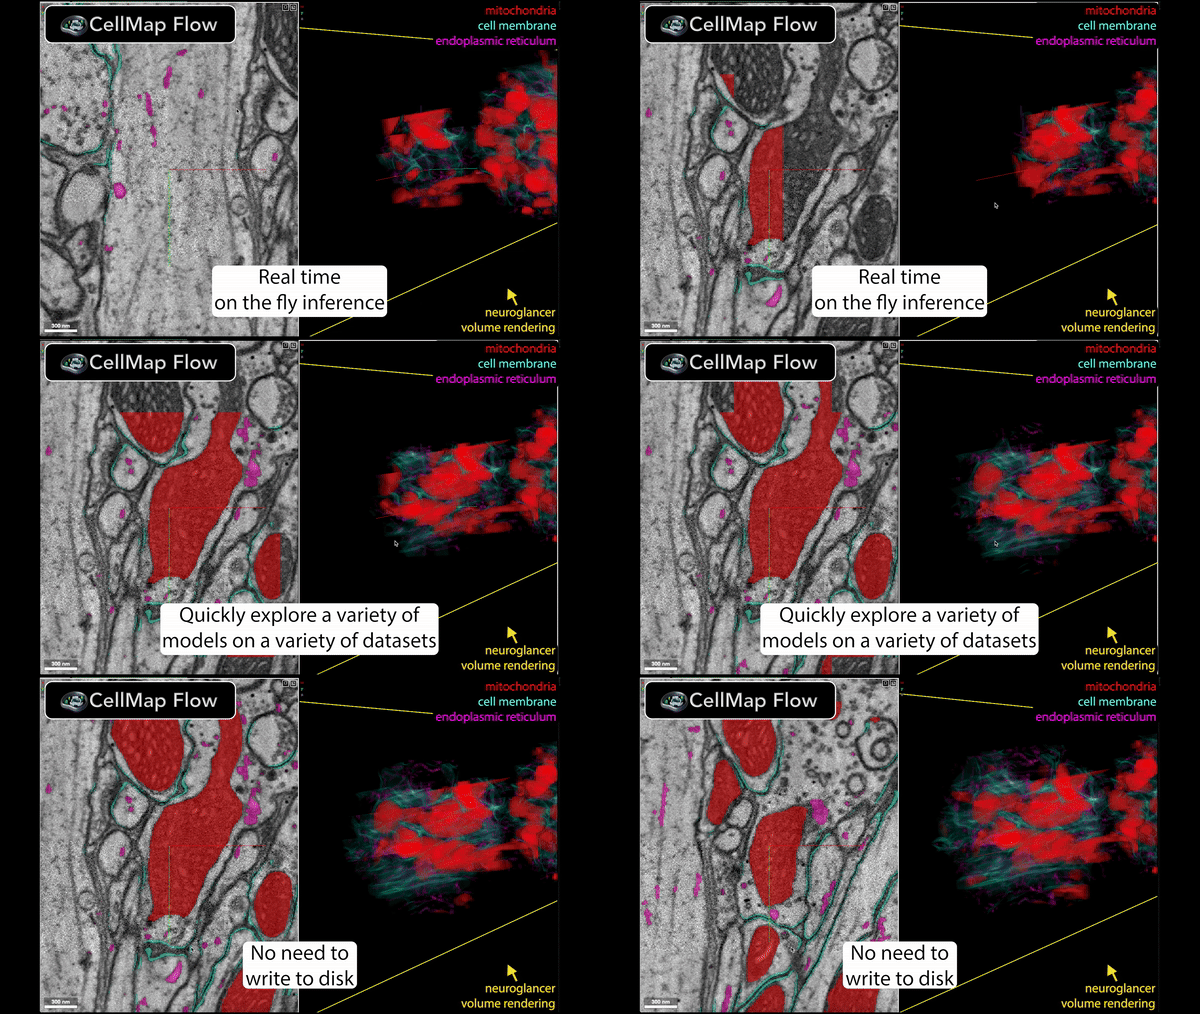
🚀 Speed up your data processing from months to minutes!
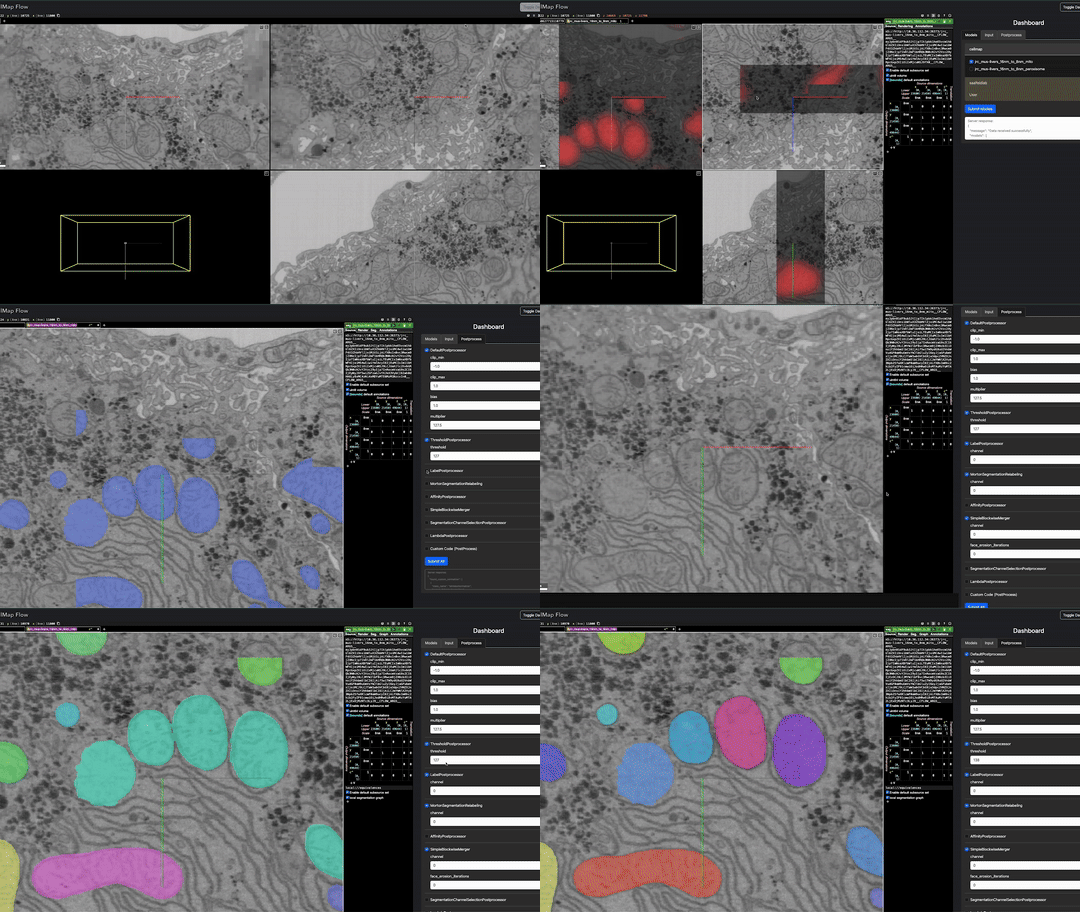
janelia-cellmap.github.io/cellmap-flow/app
is cellmap-flow with nothing to install: the dashboard as a web page, with the
models running in your browser. Open a volume, tick a model, and look at its
predictions in Neuroglancer as you move around. It is the main place to try
cellmap-flow, and the first place to test a change: every push to main
deploys it. Open this example to start from something
running: an OpenOrganelle mouse-liver volume with the mitochondria model
setup_53 on it. A link's query names the volume and the models
(?dataset=<url>&model=<name>), and Share in the header copies such a
link to what you have open: the volume, the models, the view and the
settings they run with. The address bar itself stays bare, so a new tab
starts fresh.
- Data. Paste the URL of an OME-Zarr volume served with CORS (public S3
and GCS buckets are, OpenOrganelle's
among them; the connect panel's placeholder is one). In Chrome or Edge you
can instead browse to, or drop, an OME-Zarr, zarr or N5 folder on your
machine: nothing is uploaded, the page reads it itself. A volume on your
institution's network (a host with a private address,
10.xsay) opens as it does in Neuroglancer; if Chrome asks whether the site may use your local network, allow it (connecting fails with "Failed to fetch" until you do; the setting is under Local network access in the site-information panel beside the address bar). - Models. ONNX exports of cellmap's networks from cellmap/onnx-web-models on Hugging Face, run with onnxruntime-web on your GPU through WebGPU (Chrome, Edge, Safari 26 and later), or on the CPU without it, far slower. The Input normalizers and Postprocess steps are the server dashboard's.
- Phones. The viewer fills the screen and the Dashboard button in the header opens the controls over it.
What the server mode below adds is what a browser cannot do: models that are not ONNX exports (PyTorch, TensorFlow, DaCapo, BioImage.io, Cellpose), finetuning, the Pipeline Builder and blockwise runs on the cluster. web/README.md says how the browser mode is built and run locally, and the docs' browser page covers using it.
pixi installs cellmap-flow with everything it needs, and
the separate environments some model families run in. It needs pixi 0.68 or
later, which reads this lockfile's format: check with pixi --version, and
update with pixi self-update, or brew upgrade pixi if Homebrew installed
it. pixi install sets up the default environment, and pixi run runs a
command in it:
git clone https://github.com/janelia-cellmap/cellmap-flow.git
cd cellmap-flow
pixi install
pixi run cellmap_flow view -d data_path
It installs on Linux (x86-64) and on Apple-silicon Macs. On a Mac:
- Compiler: install Apple's command-line tools first (
xcode-select --install). The neuroglancer fork used for painting annotations is compiled duringpixi install. - Model servers: a Mac has no cluster to submit jobs to, so the dashboard runs each model's server on the Mac itself. Models serve and finetune on Apple's GPU. It is much slower than the cluster's: Cellpose-SAM takes about 35 s for a chunk of 8 slices, so open one x–y panel rather than four, and for Cellpose consider
slices_per_chunk: 1. - CUDA: it is Linux-only.
Model families whose dependencies clash with the default environment run in
their own pixi environment, chosen by the model's type (see
Model types); nobody picks one by hand. Each is installed from
the lockfile the first time a model needs it, before that model's job is
submitted (several minutes, once; the dashboard's Job Logs shows pixi's
output meanwhile), so a new user, Fileglancer's included, needs nothing
beforehand. pixi run cellmap_flow envs install <name> installs one ahead of
time, and cellmap_flow envs lists them and what is installed.
To install CellMapFlow, you can use pip:
pip install cellmap-flowNote that the basic installation does not include DaCapo and BioImage.io core dependencies. To install CellMapFlow with DaCapo support, use the following command:
pip install cellmap-flow[dacapo]To install CellMapFlow with BioImage.io support, use the following command:
pip install cellmap-flow[bioimageio]To install CellMapFlow with both DaCapo and BioImage.io support, use the following command:
pip install cellmap-flow[dacapo,bioimageio]To get an unreleased branch without cloning:
pip install "cellmap-flow @ git+https://github.com/janelia-cellmap/cellmap-flow.git"Append @<branch> to the URL for a specific branch, and add extras in
brackets after the name, e.g.
"cellmap-flow[dacapo] @ git+https://github.com/janelia-cellmap/cellmap-flow.git@my-branch".
For development, clone and install in editable mode instead:
git clone https://github.com/janelia-cellmap/cellmap-flow.git
cd cellmap-flow
pip install -e .Interactive finetuning needs two dependencies that cannot come from PyPI — a
MinIO server (conda-forge only) and a Neuroglancer fork with voxel-annotation
support — so pip install cellmap-flow[finetune] on its own is not enough.
See docs/finetuning.md for the full setup.
Any model whose network is plain PyTorch can be finetuned from the dashboard, with LoRA or in full: cellmap and Hugging Face exports, fly checkpoints, DaCapo runs, scripts, BioImage Model Zoo models with PyTorch weights, and Cellpose (on its flows, from sparsely painted instances). A compiled (TorchScript) zoo model is finetuned in full only, and ONNX or TensorFlow ones not at all; the Finetune tab offers only what the selected model allows.
cellmap_flow has a subcommand for each job; cellmap_flow <command> --help
shows its options, and the CLI page lists them all,
with the names they had before 0.3.0.
$ cellmap_flow --help

Commands:
  blockwise  Run the model a blockwise YAML describes over the whole...
  dashboard  Serve the dashboard alone, for a viewer already running.
  doctor     Check the environment: what is installed, what is missing,...
  add        Resolve a model reference into a model entry, and optionally run it.
  envs       The environments models run in, besides this one.
  finetune   The finetune tools.
  infer      Start a model's inference server, then open the viewer on...
  models     List the model types and the arguments each takes.
  plugins    Register, unregister and list plugins.
  serve      Serve one model's predictions, as an inference job does on...
  view       Start CellMap Flow viewer with a dataset.
  yaml       Run multiple model inference jobs from a YAML configuration...

$ cellmap_flow view -d data_path
$ cellmap_flow yaml config.yaml
$ cellmap_flow infer huggingface -r cellmap/fly_organelles_run08_438000 -d data_path
$ cellmap_flow infer cellpose -v 64 -d data_path
$ cellmap_flow infer bioimage -m conscientious-dromedary -d data_path
$ cellmap_flow infer fly -c /path/to/run/model_checkpoint_20000 -d data_path
$ cellmap_flow infer script -s script_path -d data_path
view opens a dataset and you pick models in the dashboard; yaml runs the
models a YAML lists; infer <type> runs one model of that type (cellpose
is Cellpose-SAM).
In the dashboard, the Models tab's Job Logs shows each model's server output
as it runs: starting while it waits in its queue, installs its environment or
loads, then its status, and failed to start with its traceback when it dies
before serving.
A data path is a zarr (v2 or v3), N5 or Neuroglancer precomputed volume, on
disk or at an s3://, gs:// or https:// URL; public buckets are read
anonymously, private ones with your AWS or Google credentials. See
data paths.
A model is fed the dataset's level at its own voxel size. When the dataset has
no such level, the nearest one is resampled to it. --no-resample (or
resample: false in a YAML, or unticking the dashboard's Resample if no scale
matches the model box) uses the nearest level as it is instead, and the
dashboard warns that the model sees the wrong scale.
Models are served through chunkmirage, which keeps each model's output in memory. Panning back to chunks you have seen, or changing only the postprocessing, reuses that output instead of running the model again. The chunks nearest your view go to the GPU first, and chunks you have panned away from are dropped.
- A layer's URL is
zarr://<server>/<model><settings>/zarr; the served array puts any channel axis first and separates chunk keys with/. Only code that reads a server's zarr directly sees this. The/__control__/...routes (model_info,restart) are where they always were. - A model that runs in an environment of its own (
env:) needs chunkmirage installed there, as every environment inpixi.tomlhas. A server started where it is missing fails with a message saying so. - Memory: a server keeps up to 16 GiB of predictions.
CELLMAP_FLOW_PREDICTION_CACHE_BYTESchanges that (0for none), andCELLMAP_FLOW_RAW_CACHE_BYTES(1 GiB) bounds the raw data kept. - Servers and dashboards from before chunkmirage (the Flask server, removed in this release) do not mix with these: that dashboard cannot draw these layers, and this one no longer draws that server's. Run both from the same version.
Each model has a type, which says how it is loaded and which environment its
server runs in. In a YAML it is the model entry's type; on the command line,
cellmap_flow infer <type>; in the dashboard, the Models tab lists the
CellMap catalog, the cellmap/* Hugging Face models, the BioImage Model
Zoo and Cellpose-SAM. cellmap_flow models lists every type and its arguments.
You rarely need to pick the type yourself: cellmap_flow add REF works it out
from what you have, and prints the YAML entry, saying what it still needs. In
the dashboard, paste the same REF into the Models tab's Add a model box:
Resolve says what it is and where it runs and asks for anything missing
(a Cellpose model's voxel size, say), and Run starts it, ticked among the
models, without a YAML or a restart. REF is a path (a model script, an
exported folder, a checkpoint, Cellpose weights), a zoo nickname or bioimage.io
link, a Cellpose model name, a Hugging Face org/repo, or
dacapo:run@iteration. A whole config YAML is a run, not a model: run it with
cellmap_flow yaml.
A BioImage Model Zoo model, Cellpose-SAM, a Hugging Face repo, and a checkpoint run straight away:
$ cellmap_flow add conscientious-dromedary
$ cellmap_flow add cpsam_v2 -v 64
$ cellmap_flow add cellmap/fly_organelles_run08_438000
$ cellmap_flow add /path/to/run/model_checkpoint_20000 --run -d data_path| Type | For | Runs in |
|---|---|---|
cellmap |
A folder cellmap_models exported (metadata.json + model.ts) |
this environment |
huggingface |
A Hugging Face repo in that format (the dashboard lists cellmap/*; any other model on the Hub needs a script) |
this environment |
fly |
A fly_organelles training checkpoint, .ts or model.pt |
fly (a .ts: this environment) |
cellpose |
Cellpose 4: Cellpose-SAM (cpsam_v2, cpsam) or finetuned weights |
cellpose4 |
bioimage |
Any BioImage Model Zoo model: id, nickname, DOI, URL or rdf.yaml |
bioimageio |
dacapo |
A DaCapo run and iteration | this environment (DaCapo does not install in pixi's dacapo environment yet: give env: a conda environment with it) |
script |
Any model, from a Python script that defines it | this environment |
finetune |
A LoRA adapter or full finetune on top of another model | its base model's |
An entry's env overrides where it runs: a pixi environment's name, the path
of a conda environment, or current for this one. ~/.cellmap_flow/envs.yaml
maps environment names to conda environments, for machines without pixi:
cellpose4: /groups/mylab/home/me/miniconda3/envs/cellpose4See YAML configuration for every type's arguments, and the examples in example/.
type: cellpose runs Cellpose 4 on each z slice of a chunk, or in 3D with
do_3d: true (below). Cellpose-SAM sees
cells best about 30 voxels across, so pick the voxel_size (nm) where yours
are about that size:
models:
  cells:
    type: cellpose
    voxel_size: 64
    pretrained_model: cpsam_v2   # or cpsam, or the path of finetuned weights
    output: flows                # the default: all three channels; or probability, or masks
output |
Channels | dtype | |
|---|---|---|---|
flows (default) |
flow_y, flow_x, cell |
float32 | "Flows + probability" on the Models tab, not masks: Cellpose's flows towards each object's centre (its dP, about -5 to 5), then the cell probability; the layer colours each voxel by its flow's direction, dimmed by cell (untick the shader's flows box for cell alone), and CellposeMasksPostprocessor makes masks of them |
probability |
cell |
float32 | The cell probability alone, 0 to 1 (the sigmoid of Cellpose's logit) |
masks |
cell |
uint64 | Instance ids, unique within a chunk |
Masks are made chunk by chunk: add MortonSegmentationRelabeling to the
postprocessing so that ids differ between chunks. Each slice's masks are
separate unless stitch_threshold (0 to 1, masks only) links them: a mask
takes the id of the one in the slice before that it overlaps by at least that
IoU, within a chunk. Cellpose-SAM's weights are for non-commercial use. See
example/cellpose_sam.yaml.
In 3D (do_3d: true, Cellpose's do_3D), each chunk is segmented as one
3D image:
- Cellpose runs its 2D network on every YX, ZY and ZX plane of the chunk and sums the three into 3D flows.
- Masks follow those flows in 3D, so an object keeps one id through z, with no slice linking needed.
flowsgains aflow_zchannel first:flow_z,flow_y,flow_x,cell. The cell logit is the sum of the three orientations', as in Cellpose.- A chunk is a cube with context on every side. The defaults are 192 voxels with 24 of context, so each plane is one 256 px tile.
- With anisotropic voxels, z gets as many nm as y and x, and Cellpose is
given the
anisotropy. - It costs about 3× what slice by slice does for the same voxels: about 5 s for a 192³ chunk on an H100.
flow3d_smooth(a sigma in voxels) smooths the 3D flows first, if objects break up along z.stitch_thresholdis 2D only.
    type: cellpose
    voxel_size: 16
    do_3d: true
    output: masks
In the dashboard, the Models tab's Cellpose panel lists cpsam_v2 and
cpsam (the DINO models need a package the cellpose4 environment lacks).
Tick one, give its voxel size (required) and output, and Submit Models: it
runs as cellpose_sam_v2 for the default Flows + probability
(cellpose_sam_v2_probability, cellpose_sam_v2_masks for the other outputs,
so + output can run two side by side). Its 3D box runs it in 3D, as its
own job and layer ending in _3d, so a 2D and a 3D row can be compared side
by side.
type: bioimage runs a BioImage Model Zoo model
through bioimageio.core, with the model's own pre- and postprocessing. Its
tile size, halo and output type come from the model's description. No zoo
model declares the voxel size it was trained at, so cellmap-flow keeps them for
the zoo's EM models, looked up by hand with their sources
(bioimage_voxel_sizes.yaml),
and runs each at its own unless voxel_size says otherwise; any other model
needs voxel_size. A context of about 16 voxels hides seams between chunks:
models:
  mito:
    type: bioimage
    model: conscientious-dromedary   # a 3D mitochondria U-Net, trained at 30x8x8 nm (MitoEM)
    context: [0, 16, 16]
In the dashboard, the Models tab's BioImage Model Zoo list searches the whole zoo (EM models by default), refreshed from bioimage.io hourly, and fills in a ticked model's voxel size with the one it was trained at, saying where that number comes from. Models that need prompts or several inputs (micro-SAM) are not supported. See example/bioimage_em.yaml.
type: fly serves a checkpoint fly_organelles trained. Channel names, voxel
sizes and tile size are read from the run's folder (its train.py, training
snapshots or config.yaml) when the entry does not give them, so the
checkpoint alone is often enough:
cellmap_flow infer fly -c /path/to/run/model_checkpoint_20000 -d data_pathA folder cellmap_models exported is served with type: cellmap instead.
cellmap_flow infer dacapo -r 20241204_finetune_mito_affs_task_datasplit_v3_u21_kidney_mito_default_cache_8_1 -i 700000 -d /nrs/cellmap/data/jrc_ut21-1413-003/jrc_ut21-1413-003.zarr/recon-1/em/fibsem-uint8/s0This enables using any model by providing a script e.g. example/model_spec.py e.g.
cellmap_flow infer script -s /groups/cellmap/cellmap/zouinkhim/cellmap-flow/example/model_spec.py -d /nrs/cellmap/data/jrc_mus-cerebellum-1/jrc_mus-cerebellum-1.zarr/recon-1/em/fibsem-uint8/s0Define these variables in your script (cellmap_flow infer script -s path/to/your_script.py):
- model: The PyTorch model to be used for inference.
- input_size: The voxel shape of the data to be input to the PyTorch model.
- output_size: The voxel shape of the data in output by the PyTorch model.
- input_voxel_size: The voxel size of the data input to the model.
- output_voxel_size: The voxel size of the data output by the model.
- output_channels: The number of channels in the output of the model.
- process_chunk (optional): (Optional) A function that takes an ImageDataInterface and an ROI and returns the data to be display. This can be used to run a TensorFlow model or do other custom data processing.
To run TensorFlow models, we suggest installing TensorFlow via conda: conda install tensorflow-gpu==2.16.1
List them in a YAML file (docs/source/yaml_config.rst) and run
cellmap_flow yaml config.yaml